Making room for bigger tires - Trimming Wheel Openings
July 2006


The easiest way to cut and weld the fenders is to remove em. I swear my body guy had the front bumper and fenders off before I could grab the camera. Must be easy. My goal was get as much of the fender cut as was practical and still keep it looking stock. We decided on an inch and a quarter (1-1/4") because that's as much as we could do on the rear. Below you'll see we went as close to the rear door as possible and still leave a little sheet metal. Now it's a matter of deciding which mounting areas can be reused. In the case of the front fender he was able to use all the inner fender mounting points. A little trimming is necessary on the inner fender as well. Be careful what you cut, if a pinch weld is cut be sure to competely reweld what was cut to maintain structural integrity. Using air tools makes short work of all this sheet metal cutting. He used a 3" cutoff wheel and cut through the fenders like they were butter. Taking your time to do as clean a cut as possible here will help you later. You'll want to keep the existing wheel opening lip to reweld and reuse.


These photos show how the new fender lip is relocated. Since the opening is now bigger you'll see the old lip needed to be cut where it curves. It's not long enough to fit around the new circumference so make fit what you can. The rest will have to be fabricated from either an old fender or some other sheetmetal. We used an old fender from the scrap pile. Several spot welds with a wire feed welder will be plenty to hold it all together. One of the more important tasks will be to take care of the metal behind the fender. Here he put a good layer of urethane sealer and gave it a coat of undercoating. This will keep the water and mud from eating the metal. On the outside it's a typical body repair. Grind away all the paint and give it a coat of plastic bondo filler. Once the bondo is filed away it will fill any scratches and make the repair as smooth as new.


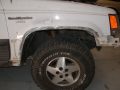
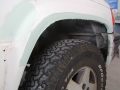
The rear wheel openings are done similar to the front fenders. The big difference, of course, is you have to do the trimming on the jeep. Here are some shots of using the air cutting wheel tool and air hacksaw. The cutting wheel gets through the first layer, the hacksaw goes through the inner wheel well. Since you're cutting the pinch weld from the inner and outer quarter panel more care needs to be taken to repair it right. The new lip needs to be welded to both the inner and outer metal for best structural integrity. Another lathering of urethane and undercoating finishes the underside. Note the extra care that was needed in cutting and rewelding the rocker itself.


There are a number of ways to cut and repair plastic bumpers and claddings. These photos show a couple of examples of what needs to be cut and how to reattach and finish the work. Essentially the bumper lips are being moved back behind the edge form a new lip. If you'll look close at the fourth picture you'll see several little holes. What he did was drill many holes through both pieces of plasic at the location it was going to be placed. These little holes act as little dowel pins to hold the pieces together. The plastic repair urethane is squeezed through the holes when being clamped together, making a solid repair. And keeping the stock look. A little bondo to smoothe the rough edges.


And here is how it looked for months while I waited for a slow time to paint it. A few dings and dents were repaired and a coat a primer to protect it until later. And ugly was ready to drive.